Desert Online General Trading LLC
Dubai, United Arab Emirates
Desert Online General Trading LLC
Dubai, United Arab Emirates


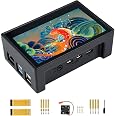
🚀 Elevate your Raspberry Pi game with a touchscreen that means business!
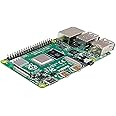
The Waveshare 4.3-inch DSI LCD Display is a high-performance capacitive touchscreen designed specifically for Raspberry Pi 4B and compatible models. Featuring an 800x480 IPS panel with toughened glass and a protective case, it delivers vibrant visuals and wide viewing angles. With a 60Hz refresh rate and driver-free support for multiple OS platforms including Raspbian, Ubuntu, Kali, Retropie, and Windows 10 IoT, this plug-and-play display is perfect for developers and tech enthusiasts seeking a sleek, reliable interface for their projects.
| Brand | Waveshare |
| Product Dimensions | 11.1 x 7.29 x 1.02 cm; 281 g |
| Item model number | 4.3pollici DSI LCD (con case) |
| Manufacturer | Waveshare |
| Series | 4.3inch DSI LCD (with case) for Rasp Pi |
| Colour | 4.3inch DSI LCD (with case) |
| Standing screen display size | 4.3 Inches |
| Screen Resolution | 800x480 |
| Resolution | 800x480 |
| Number of USB 2.0 Ports | 2 |
| Voltage | 5 Volts |
| Are Batteries Included | No |
| Item Weight | 281 g |
| Guaranteed software updates until | unknown |
Trustpilot
1 month ago
3 weeks ago